Make Beautiful Websites with R - Part 1: Introduction
You can create a website with R, share your R, Python, and Julia (+ likely others) code, and display the result in the content of your article..
This is the first part of the “Make Beautiful Websites with R” series. This article will teach you the architecture and tech track of creating beautiful websites with R.
Why make websites in R?
-
Extremely fast because it is a static website.
-
Include your R, Julia, and Python code and display the output.
-
Use RStudio Visual R Markdown editor.
-
Supports Markdown, RMarkdown, and Hugo functionalities.
-
It does not require server-side scripts such as PHP or databases like WordPress does.
-
It is cool to have your website with, end-to-end, the entire architecture designed and implemented by you.
Imagine writing on medium; you write about some topic, put forward an idea or theory, and write code to show how it works. You do the same here, but your code (R, Python, Julia, and likely others) will be executed, and its output will be displayed in your article.
You can do many other things with your website besides sharing your code and displaying its outcome.
You can find the tech track below for creating websites with R. It may look daunting at first, but each step is simple, maybe except for deploying your website to a server, but I will guide you through it so that it will be easy.
Tech track for a beautiful website with R
-
R
-
RStudio
-
Blogdown package (your website is ready for deployment in this step)
-
Hugo
-
Digital Ocean
-
PuTTY (for Windows)
-
Ubuntu Server configurations
-
WinSCP (option 1) (for Windows)
-
Recommended workflow (Option 2)
-
Git (recommended, option 2)
-
GitHub (recommended, option 2)
-
Manually pulling website content from GitHub (a)
-
Automated pulling website content from GitHub via cron jobs (b)
Of course, depending on your needs, the list can be shortened or extended, but it covers all the necessary software for building a beautiful website with R.
1. R
You can learn more about R if you don’t know already at
You can download R from
2. RStudio
RStudio is an integrated development environment, IDE, for R, a programming language for statistical computing and graphics. (Wikipedia)
Download RStudio from
After the v1.4 release, RStudio(now Posit) included a Visual R Markdown Editor that gives you a decent CMS-like experience. You can think this is something similar to the medium’s editor. Add a heading, write any text, bold or italic, insert a table or picture, code chunk, latex math symbols or equation, and many others. Then, as outlined at the start, your codes are executed, and the outputs of code chunks are displayed.

Apart from using RStudio for writing articles for your website, it is the most used IDE for R programming language and one of the most advanced IDEs ever created for statistics and data science.
3. Blogdown package
The blogdownis an R package that helps you create general-purpose (static) websites with R Markdown and Hugo. The “blog” in the package’s name (blogdown) should not confuse you; it is also used for general-purpose websites, not only blogs.
Your fantastic website is ready at this stage. The next step is to deploy it to a server so everyone can visit it and see the awesome content of your website. I will show you how to deploy your website to Ubuntu Server from Digital Ocean in the Make Beautiful Websites with R series.
4. Hugo
Hugo is one of the most popular open-source static site generators. With its amazing speed and flexibility, Hugo makes building websites fun again. (Hugo)
We will not be learning Hugo in this series. Hugo is a static site generator used by the blogdown package. We will be only changing the content of the configuration files for our needs, but the details of Hugo are beyond the scope of the Make Beautiful Websites with R series.
You can read “An Introduction to Static Site Generators,” where David Walsh perfectly explains what a static site is and how it differs from dynamic sites.
If you are interested in learning more about static sites, you can read the following articles:
5. Digital Ocean
The below picture high level displays how you, I, and the rest of the people in the world visit websites from their browsers. Generally, almost always, the content of the websites is stored in Linux Server (I prefer Ubuntu) and served to the world by a Web Server within the Server.
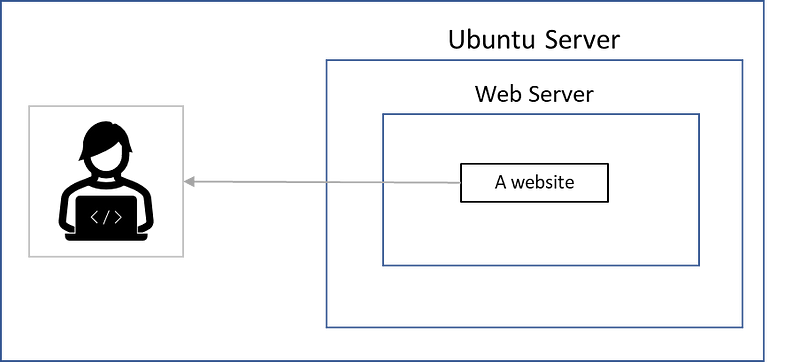
Caution: Ubuntu is a Linux distribution, and I use “Server,” “Ubuntu Server,” and “Linux Server” interchangeably in this article. All refer to the Ubuntu Server.
If you know how to use other Linux distributions, feel free to use something else. However, I prefer Ubuntu because it’s the only Linux distribution I know how to use and the most used Linux distribution in the world.
Deploying your website to the server is the most demanding part of the entire process. Nevertheless, I will guide you through and provide visuals to help you easily deploy your website to the server.
You can rent a server from many companies, but I recommend using Digital Ocean because it is straightforward. Digital Ocean’s dashboard is easy to use, and most importantly, you know how much you will pay, unlike Microsoft Azure and AWS.
If you want to use a server from Digital Ocean, you can use my referral link to have one. You will get a $200 free credit for 60 days using my referral link.
Nevertheless, as a newcomer to Digital Ocean, you will still get $200 even if you don’t use my referral link. By using the referral link, you would have also helped me to get some free credit.
6. PuTTY
After the previous step, we have a remote server sitting in one of the data centers of Digital Ocean. We need to connect this remote server to make the necessary configurations to deploy our website.
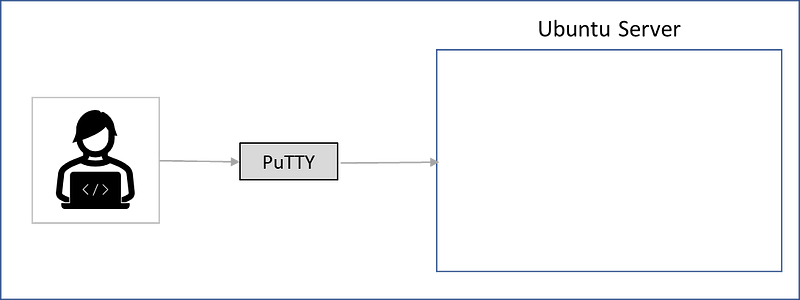
I have a windows PC; therefore will be connecting to the server using PuTTY. If you are using Mac or Linux, there are other alternatives, and I believe the working logic is similar to PuTTY.
7. Ubuntu Server configurations
After connecting to Ubuntu Server from our PC using PuTTY (or other software for Mac or Linux), we need to configure the server so that our website can be served and accessed by others. We will also be installing and configuring a web server called Nginx. The two most popular web servers are Nginx and Apache.
8. WinSCP
You created your website on your PC and made the necessary configurations in Ubuntu Server. The next step is to transfer the content of your website from your PC to the remote Server.
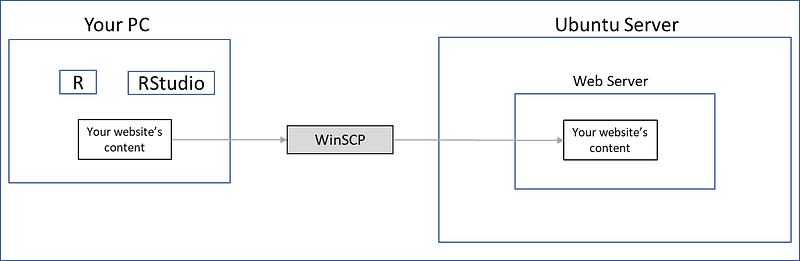
We use WinSCP to transfer the files from our local PC to Ubuntu Server, or vice versa, using a visual interface. It is like moving files between folders on your PC. In this case, we will transfer website contents from our PC to a folder in Ubuntu Server. I will show how to do that using WinSCP in the following parts of the “Make Beautiful Websites with R” series. This will be Option 1.
If you think this workflow meets your requirements and are willing to copy-paste your website’s content when you make changes, you can directly skip through to the bottom of the page to read the conclusion.
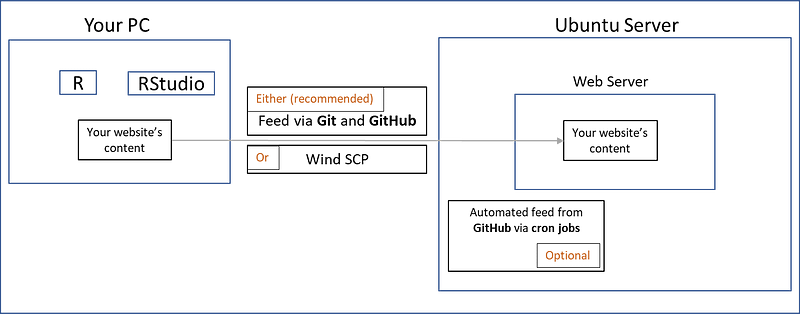
But I recommend Option 2, using Git and GitHub and scheduling a cron job in the server to automatically pull your content from GitHub and save it to the appropriate folder within your server. Your web server will then serve it to the world.
9. Recommended workflow
This is the recommended workflow for a beautiful website with R and is how I’m doing on plootra.com.
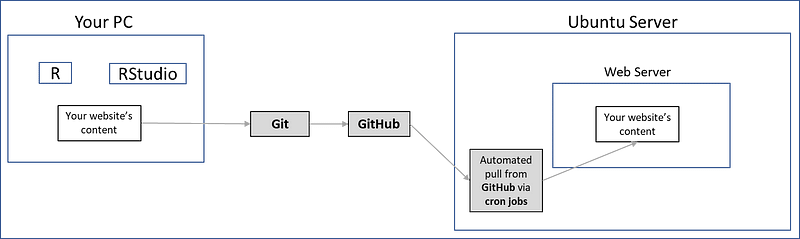
In this approach:
-
1) You will be creating your content in R Studio
-
and 2) pushing this content to GitHub using Git (super easy with R Studio)
-
And the content of your website will be 3) automatically pulled by the cron job in the server and copied to the appropriate folder so that it can be served to the world by your web server.
One significant advantage of this approach is that if your PC dies, you lose folders, change PC, etc., you can always pull your website’s content from GitHub to your current PC.
10. Git
Git is a free and open-source distributed version control system designed to handle everything from small to very large projects with speed and efficiency. (Git)
If you want to learn more about Git version control, you can read the second chapter of the progit book. You will learn all the basics you need by reading just one chapter.
RStudio here again will be a great help to us. We will be committing and pushing all changes to GitHub from our local PC, i.e., a new article, using the commit button in RStudio.
11. GitHub
Git and GitHub are not the same! I always thought they were the same before I started to use them 😄
GitHub is an Internet hosting service for software development and version control using Git. It provides the distributed version control of Git plus access control, bug tracking, software feature requests, task management, continuous integration, and wikis for every project. Headquartered in California, it has been a subsidiary of Microsoft since 2018 (Wikipedia)
You can think of GitHub as a visual version control. The content of your website is first sent to GitHub and then sent to the “web server” within Ubuntu Server.
I could not explain simpler than this and would appreciate it if you could recommend a more simple and elegant explanation than what I provided above.
12. Manually pulling website content from GitHub (either a)
After you push the content of your website to GitHub, you need to transfer it to the server. You can connect to the server using PuTTy and manually write commands on the server’s terminal.
13. Automated pulling website content from GitHub via cron jobs (or b)
I rarely connect to my server because the scripts I created in the server automatically do the job for me every day at a specific time. To automate the task in Ubuntu Server, we write “shell scripts” and enter commands in crontab. Cron will automatically execute the scripts and do the job for us.
Conclusion
Hopefully, you enjoyed reading this article and now know what the architecture of a website with R looks like. Each step is simple, and I’ll explain each in detail in the following articles.
Once you have it, you have it. After that, the rest is fun and joy.
I would love to see your beautiful website with R, and please share the URL in the comments if you have one.